What Happens During Professional Deck Restoration?
A worn deck can make your entire backyard feel older than it really is. The boards may look gray, the stain may be peeling, or the surface may feel rough under your feet. For many homeowners, the first question is simple: can this deck be restored, or does it need to be replaced?
The answer depends on the condition of the deck. In many cases, a deck that looks weathered on the surface can still be restored with the right process. Professional deck restoration is not just about making the wood look better. It is about cleaning, preparing, repairing, and protecting the deck so it can continue to hold up against sun, moisture, and everyday use.
For homeowners in Burlington County and South Jersey, understanding the restoration process can help you know what to expect before scheduling the work.
Step 1: Deck Inspection
The process usually starts with an inspection. Before any cleaning or staining begins, the deck needs to be evaluated for safety, damage, and overall condition.
A professional will look at the boards, railings, stairs, fasteners, framing, and visible problem areas. The goal is to determine whether the deck is a good candidate for restoration or whether repairs are needed first.
Some decks only need cleaning, sanding, and staining. Others may have loose boards, damaged steps, raised nails, soft spots, or areas of rot that should be addressed before refinishing.
This step matters because staining over damaged or unsafe wood does not solve the underlying problem.
Step 2: Cleaning the Deck Surface
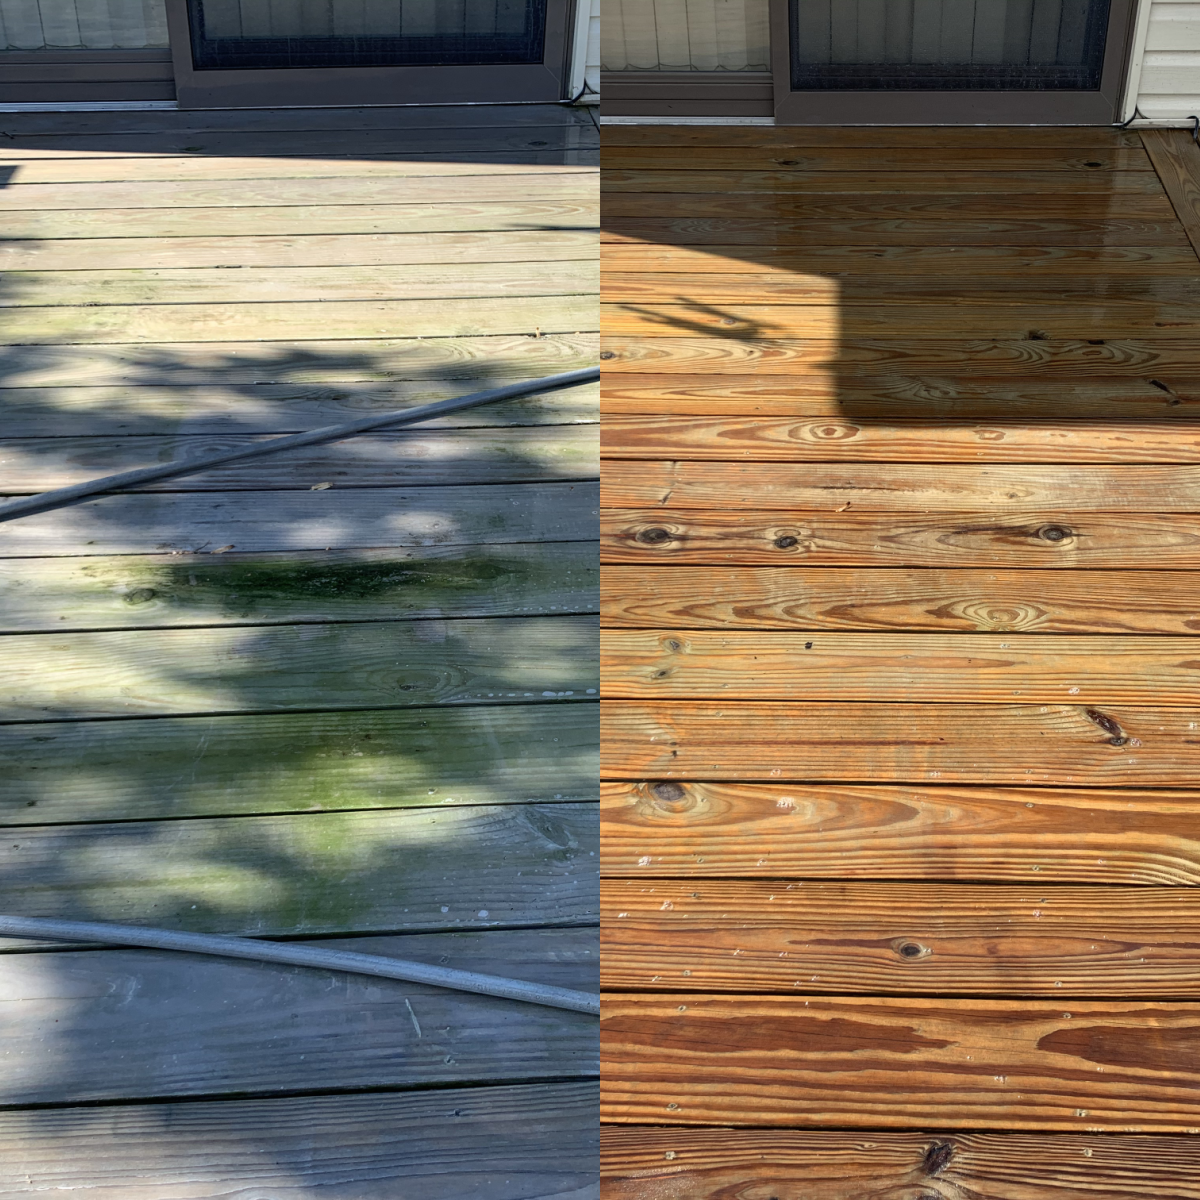
Once the deck has been inspected, the surface needs to be cleaned. Outdoor decks collect dirt, pollen, mildew, algae, leaf stains, and years of weather exposure. If these contaminants are not removed, the new finish may not bond properly.
Cleaning helps remove buildup from the wood and prepares the surface for the next steps. The exact cleaning method depends on the condition of the deck and the type of previous coating.
A deck should never be treated like a concrete driveway. Too much pressure can damage wood fibers and leave marks in the surface. Professional cleaning focuses on removing grime and failed finish without causing unnecessary damage to the boards.
Step 3: Removing Old or Failing Finish
If the deck has old stain, sealer, or paint that is peeling or flaking, that failing finish needs to be addressed before a new coating is applied.
This may involve stripping, sanding, or a combination of preparation methods. The purpose is to remove loose or incompatible material so the new stain can penetrate or adhere correctly.
This is one of the most important parts of the restoration process. If new stain is applied directly over failing old stain, the result may look uneven and may not last.
Proper prep work is what separates a professional restoration from a quick surface-level refresh.
Step 4: Sanding Rough or Weathered Areas
After cleaning and finish removal, sanding may be needed to smooth the surface and open the wood grain. Sanding can help reduce splintering, remove raised fibers, and improve the appearance of weathered boards.
This is especially helpful on decks that feel rough underfoot or have been exposed to years of sun and moisture.
Sanding also helps create a better surface for staining. When the wood is properly prepared, the finish can absorb more evenly and create a cleaner final result.
Step 5: Deck Repairs
Before stain or sealer is applied, repairs should be completed. This may include replacing damaged boards, securing loose boards, tightening railings, addressing protruding nails or screws, or fixing problem areas on stairs.
Not every deck needs major repair work. But even small fixes can make a big difference in the safety and finished appearance of the project.
Restoration should improve both the look and usability of the deck. If the deck has unsafe areas, those should be corrected before the finishing stage.
Step 6: Choosing the Right Stain or Finish
The right stain depends on the age, condition, and appearance of the deck. It also depends on the homeowner’s preference.
Some decks look best with a semi-transparent stain that allows the natural wood grain to show. Others may need a more solid finish to create a consistent look, especially if the boards have heavy discoloration or previous coating issues.
A professional can help determine which finish makes the most sense based on the deck’s condition, sun exposure, previous stain history, and desired appearance.
The goal is to choose a product that looks good and provides lasting protection.
Step 7: Applying the Stain or Sealer
Once the deck is clean, dry, repaired, and properly prepared, the stain or sealer can be applied.
This step needs the right weather conditions. If the wood is too wet, the stain may not absorb properly. If rain is expected too soon, the finish may be affected. If temperatures are outside the recommended range, the final result may suffer.
Application should be even and controlled, with attention paid to boards, railings, stairs, edges, and areas that receive heavy exposure.
A properly applied finish helps protect the deck from moisture, UV damage, and regular wear.
Step 8: Final Review and Dry Time
After the finish is applied, the deck needs time to dry and cure before normal use. Dry time can vary depending on the product, temperature, humidity, and weather.
Before the project is considered complete, the deck should be reviewed for consistency, coverage, and overall appearance.
Homeowners should also receive basic guidance on when they can walk on the deck, move furniture back, and resume regular use.
Why the Professional Process Matters
Deck restoration is more than a cosmetic project. Done correctly, it helps extend the life of the wood and protect the deck from continued damage.
Skipping steps can lead to early failure. Staining over dirt, mildew, damp wood, or peeling finish can cause blotching, peeling, and poor protection. That is why prep work is such an important part of the process.
For homeowners in South Jersey, where decks deal with humidity, rain, heat, and winter weather, proper restoration can make a noticeable difference.
Restore Your Deck With Deck Restoration Plus
If your deck is gray, peeling, splintering, or no longer repelling water, professional restoration may be the right solution.
Deck Restoration Plus provides deck cleaning, sanding, staining, repairs, and full deck restoration services for homeowners throughout Burlington County and surrounding South Jersey areas.
Contact Deck Restoration Plus to schedule an estimate and find out what your deck needs before another season of weather exposure.